
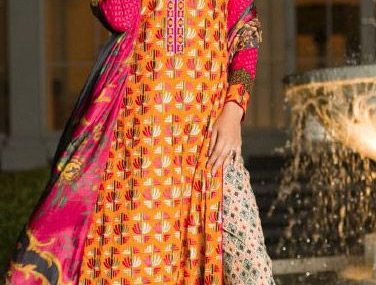
Batik Printing
Batik is popularly known as, ‘cloth with little dots’. Batik print has its own charm; it is the way of applying designs onto materials. Batik is famous in Egypt and the Middle East since 1500 years back but it is becoming popular in Indonesia especially in Java. It is done by waxing the part of the fabric that has to be left without dyeing. The principle of water and wax repel is applied in here. Batik is considered both an art as well as craft, is very famous and popular in the world and provides artistic freedom as the patterns are put on cloth by drawing rather than weaving it by thread.
Batik is very durable and the colors are more permanent and natural than painting or printed fabrics. Batik as a process is quite interesting.
All we need to carry for Batik printing process is:
- Material– Any fabric can be taken- cotton, linen, silk etc. Synthetic fibres cannot hold the dye properly so it is advised to avoid it.
- Wax- Available almost everywhere, paraffin wax is easy to use. Batik wax is available as a mixture of paraffin and beeswax.
- Frames– Different sizes of frames are used according to the length of the fabric. A masking tape is used to prevent the fabric from tearing.
- Electronic wax pot– to heat the wax and melt the wax.
- Brushes – various sizes and shapes of oil brushes are best for wax. Stiff brushes are best for pushing the wax into the fabric.
- Tjantings- These are the traditional batik tools used to draw patterns on the wax onto the material, available in various shapes and sizes.
- Water dyes and dye bath – colored dyes in the form of powder are used for dyeing. The dye bath is used to immerse the batik.
It is important to choose your colors right, as colors depict the richness in the patterns of the Batik print. Pre-planning is necessary in batik because using the same shades of colors may result in overlapping of colors. Light colors are dyed first and then the dark colors. Dark colors once dyed cannot be made lighter. The final presence of color depends on the amount of dye used in the process.
Batik printing process is detailed below:
- The fabric is washed first, once it is dry a desired length is cut leaving a little cloth for overlapping it on the frame.
- An outline of the design is sketched with the help of a pencil after framing to give a stiff base to the fabric.

- The fabric is stretched over the edges and pinned up. A stretch of the fabric is necessary to apply the wax evenly onto it.
- The best part of batik is, ‘creativity at its best’, Yes any pattern, any design. Tracing is done with the help of a soft pencil and the design is made.
- The wax is heated till it turns liquid. Test the wax on a small area, if the wax penetrates the fabric then it is transparent else heat it more.
- The areas that have to remain white are waxed first with the help of brushes or tjantings. Prevent the wax from dripping sideways using newspapers. While the tjantings are used it is important to see they stay in the wax pot till needed. The right size of brush is to be used to cover large areas to push the wax into the fabrics.
- Both the sides of the fabric are checked to make sure that wax has got into the fabric. Applying the wax again provides an extra protection when the dyeing is done.
- Now dyeing is to be done, by pouring the dye in a dye bath. The batik is taken off from the frame and immersed into the dye bath. Precautions are to be taken to prevent the fabric from getting cracked therefore the fabric is kept flat.
- Once the dye penetrates the fabric, it is removed from the bath. If the desired color is not obtained the process is repeated. Folding the fabric results in cracks and the dye gets into these cracks easily.
- The batik is hanged to dry or a hair drier is used for a faster drying process.
- Once the batik is dried up fully, remove the wax with a knife. Dip the batik with wooden thongs into boiling water for a couple of minutes, this gets rid of the wax and sets the dye.
- Next dip the batik in cold water to immediately solidify the wax. This process is repeated till the batik is waxed heavily.
- All the remaining traces of wax is removed by boiling it in hot water.


Batik is a messy yet fun process therefore, it is recommended to consult before trying it yourself. The process of batik can be repeated any number of times to get different combinations of colors. If you are sure enough then you can try this on your own to get a new Batik print everytime. There is no stopping to beautiful patterns and designs. Enjoy !!


4 comments
I like to be designer like you. I am living in Africa Tanzania, Tanga Region. I really interested to become a batik designer.
Regards
HI Martha
You will have to find a local school or a batik house and learn the craft from there. Thanks
I would really like to know if you can send me a step by step video guard on how to Batik. I think this would be most helpful. I was also like to try several ways of batiking. Much thanks,
Bea
Hi there… I haven’t created a tutorial. A lot of tutorials are available on Youtube. You can see any of them and learn. Take care!